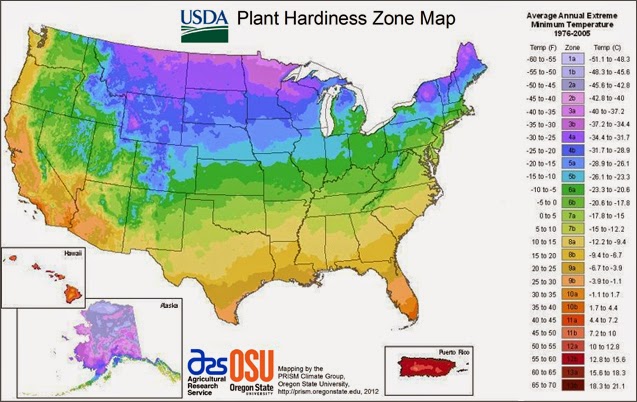
In Zone 5, where we're still wearing our parkas into April (that's New York, slathered in blue), it's hard to get a jump on the growing season. Last year, by the time I put seeds into the ground, it was too short a season to get a meaningful booster crop for our dinner table. This year, I decided to try my hand at making a cheapskate - er, economical - greenhouse or for our raised bed garden.
If you're like me, you don't have a lot of scratch for a glazed greenhouse. While it might be a dream come true to afford one, the reality is, the more you spend on the greenhouse, the less money you have to put something in it. And isn't that the point of gardening?
My trip to the hardware store yielded the following items for under $30.00:
- One bag of assorted plastic clamps
- One package of 9' x 12', 2 mil clear plastic drop cloth
- Two ten-foot pieces of 1/2" PVC pipe (conduit is cheaper, but I needed something smaller-gauge so it was easier to bend)
- One 1" PVC cross
That's it - five items! This is all you need to make a hoop house or cold frame for your raised bed garden.
To assemble the frame, insert each section of PVC pipe into the cross, making a large "X." The cross is loose enough to admit both pieces of PVC, which will lie one top of the other inside the cross where they intersect. The cross has no sharp edges to tear your plastic sheeting, and there's no tool-assisted assembly. Tension holds it all together once you put it into your raised bed.
Next, carry the structure to your bed and sink the ends of the pipes down about 10" into the corners of your raised bed. The farther down you sink it, the more secure your cold frame will be. If your bed isn't as deep as mine, or you're concerned about wind, you can secure the ends by sliding them into metal, U-shaped pipe hangers or "hanger tape" (also available from your hardware store) screwed to the corners of your box. I opted for a more low-tech solution, as my raised bed is deep enough not to make wind a concern. There's no one right answer, as long as it works for you! When you've set up the frame, it will look like this:
Next, open the package of poly sheeting and lay it over the frame. It's better to err on the generous side, so you have enough around the perimeter to clamp some of the sheeting edges to your box, preventing air from getting into your raised bed and chilling your plants. Trim the sheeting to size. My raised bed is about 4' x 4' and I was left with a section of about 4' x 12' - good for covering containered herbs on chilly days or putting over that compost pile to help heat and decompose the organic matter!
Once you've trimmed the sheeting, clamp the edges down to the box, being sure that you have enough hanging over the edge to prevent drafts. Use as many of those clamps as you like, depending on your wind conditions. I still have some left, which I'm sure the hubby can use!
After that, you're done! The entire project took me under a half an hour, with no technical know-how or special tools. The temperature inside the greenhouse is noticeably warmer than outside. You can open some or all of the cover on warmer, sunnier days so you don't "cook" your plants. You can also use this setup to grow a four-season harvest! Leafy vegetables like spinach are great at surviving the winter and will satisfy that need for fresh greens when snow's on the ground. There are many more vegetables that can be grown year-round. Their vigor depends on length of daylight and protection from the moisture-stealing winter winds. Check your library or the Internet for possibilities available for your agricultural zone.
When you're finished using the greenhouse (i.e. your zone has finally reached a warm enough daily temperature not to need it), simply break it down and store it. It's that easy! Happy gardening, and Happy Earth Day!


No comments:
Post a Comment